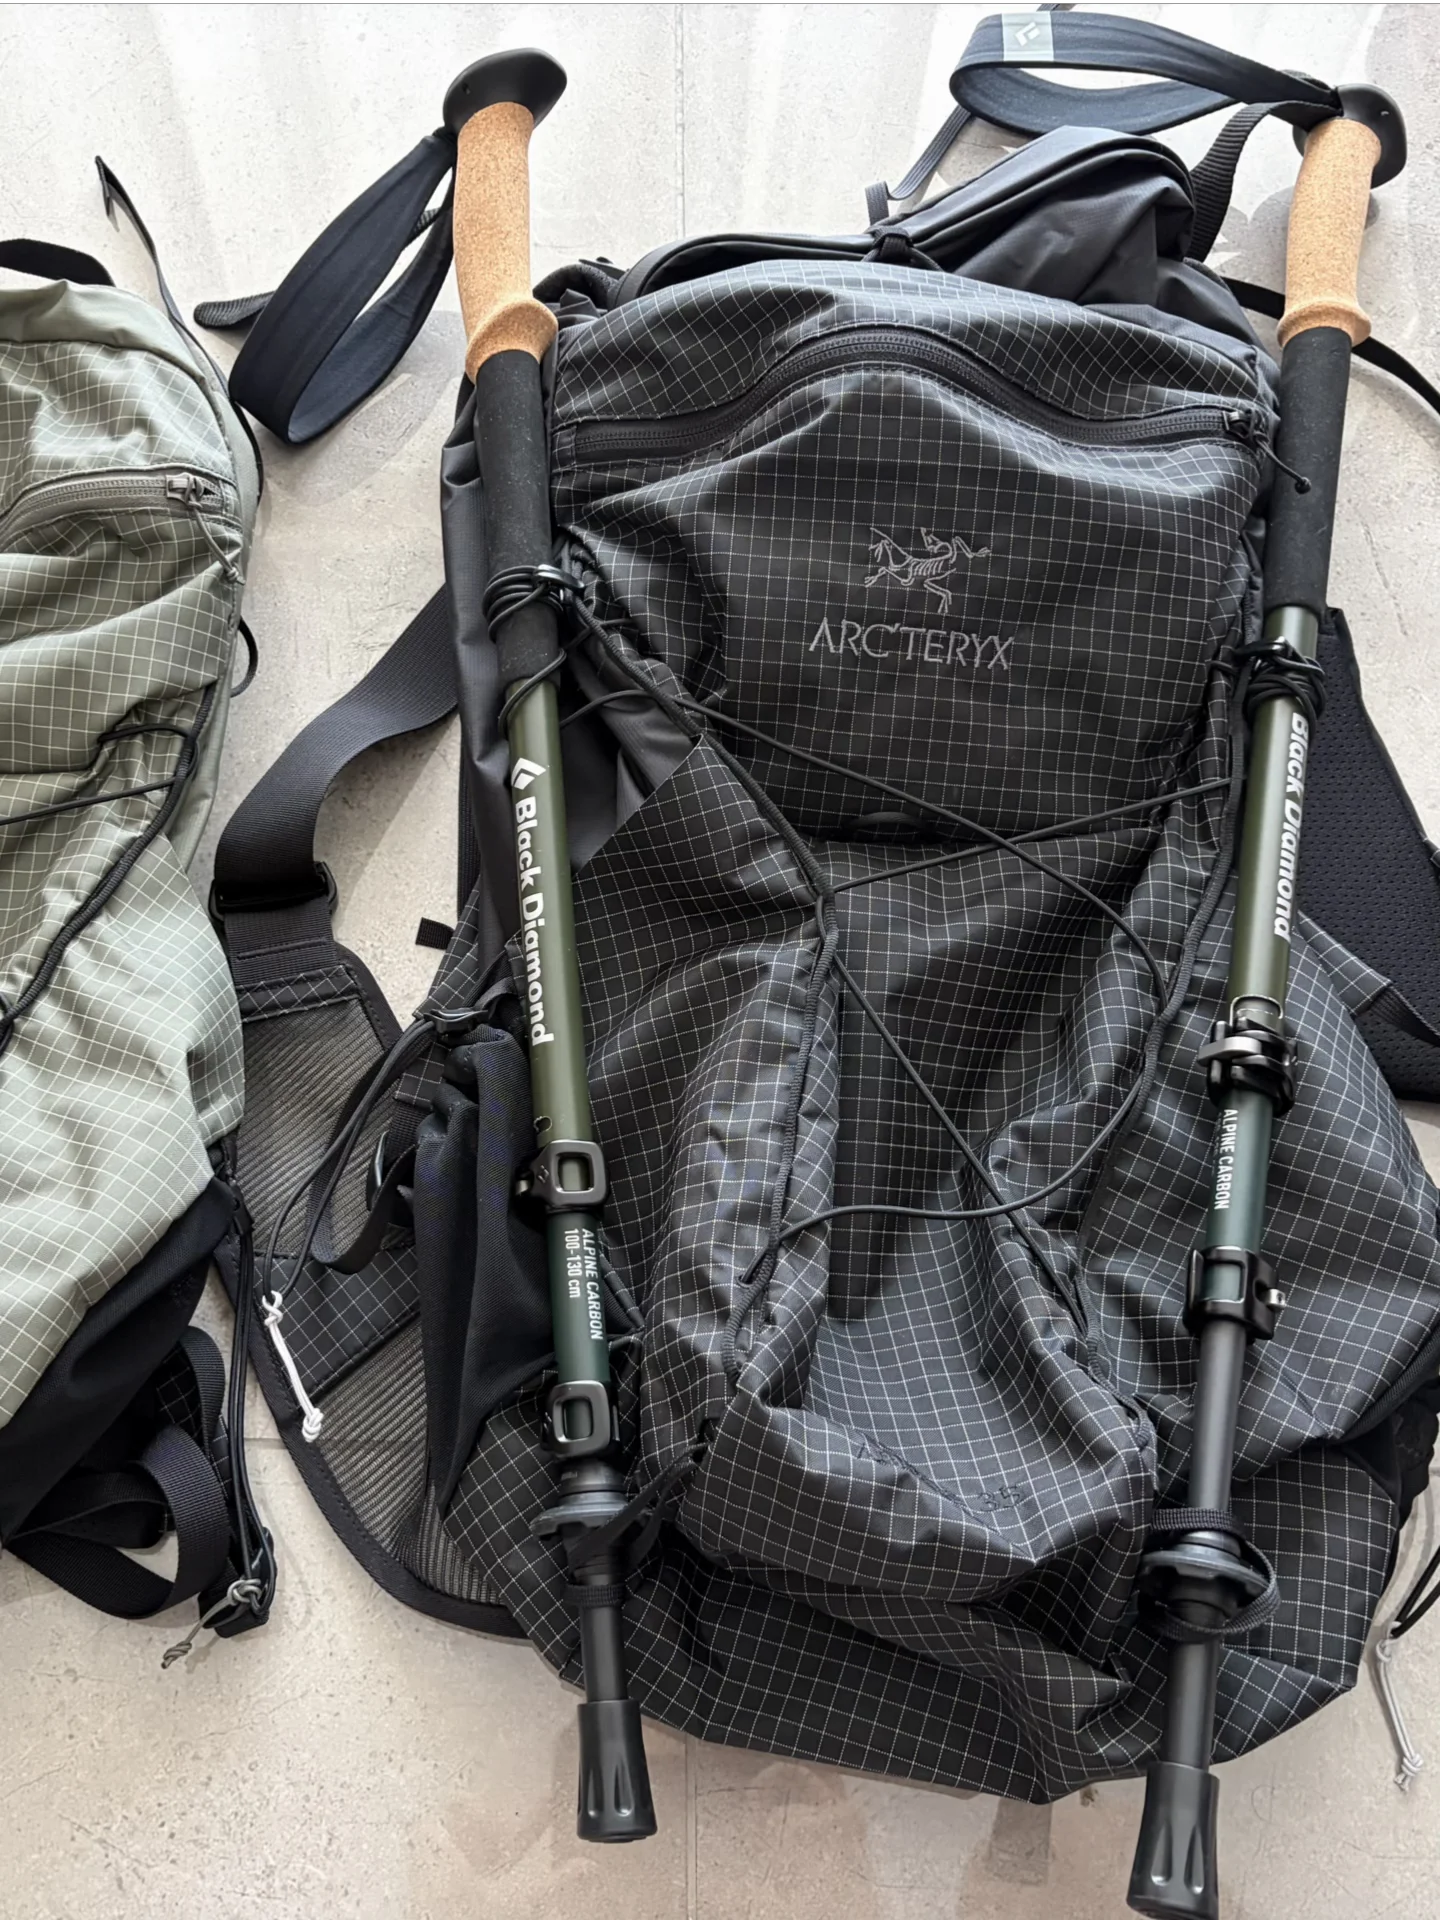
To attach hiking poles to a backpack, shorten or fold them, secure them at two separated points, and keep the tips contained and away from people. Use the pack’s intended pole holders when available, then check the arrangement with the bag loaded. A pole should stay settled when you walk, turn, and take the backpack off.
Find the intended attachment points first
Empty enough of the bag to see its loops, straps, and cord locks, then identify which features are intended for poles. A small loop near the base may work with an upper retainer. Other packs have side compression straps, a dedicated sleeve, or a quick-stow system.
Check the instructions for your pack model. A loop intended for another tool can look similar without providing the same arrangement. Note how the pole is retained at the bottom and how the shaft is held higher up.
Osprey’s owner-manual library is one example of where to find model-specific attachment instructions. Use the diagram for your exact bag and generation. A quick-stow feature near the harness works differently from the rear tool attachment on the same pack.
Lay the poles beside the bag before tightening anything. Decide which end goes into the intended lower holder, where the upper retainer closes, and whether the grips will project above the pack. Keep the route from one attachment to the other clear of loose straps.
Shorten the poles before securing them
Collapse telescoping sections within their marked limits or fold corded sections as designed. Keep the sections together with their supplied keeper if there is one. Protect the tips with the appropriate caps for transport.
Shortening reduces how far the poles extend beyond the bag. It also makes it easier to keep them away from your head and from someone behind you. Try the packed arrangement while wearing your usual hat and upper layers.
Keep the wrist straps tucked in. A loose loop can catch when you set the bag down or pass vegetation. Check that any section joint or lever is not pressed against the pack in a way that could open it.
Secure the lower end and the upper shaft
Start with the lower holder, then close the upper retainer around the shaft or bundle at the intended position. Those separated points help control both sliding and swinging. Tighten enough to hold the poles without forcing a plastic fitting or crushing the packed contents.
For a side-pocket arrangement supported by the pack design, check the pocket depth and the compression strap above it. A shallow pocket with a loose upper strap may let the poles tip outward. Keep the lower contact point clear of items that could be punctured.
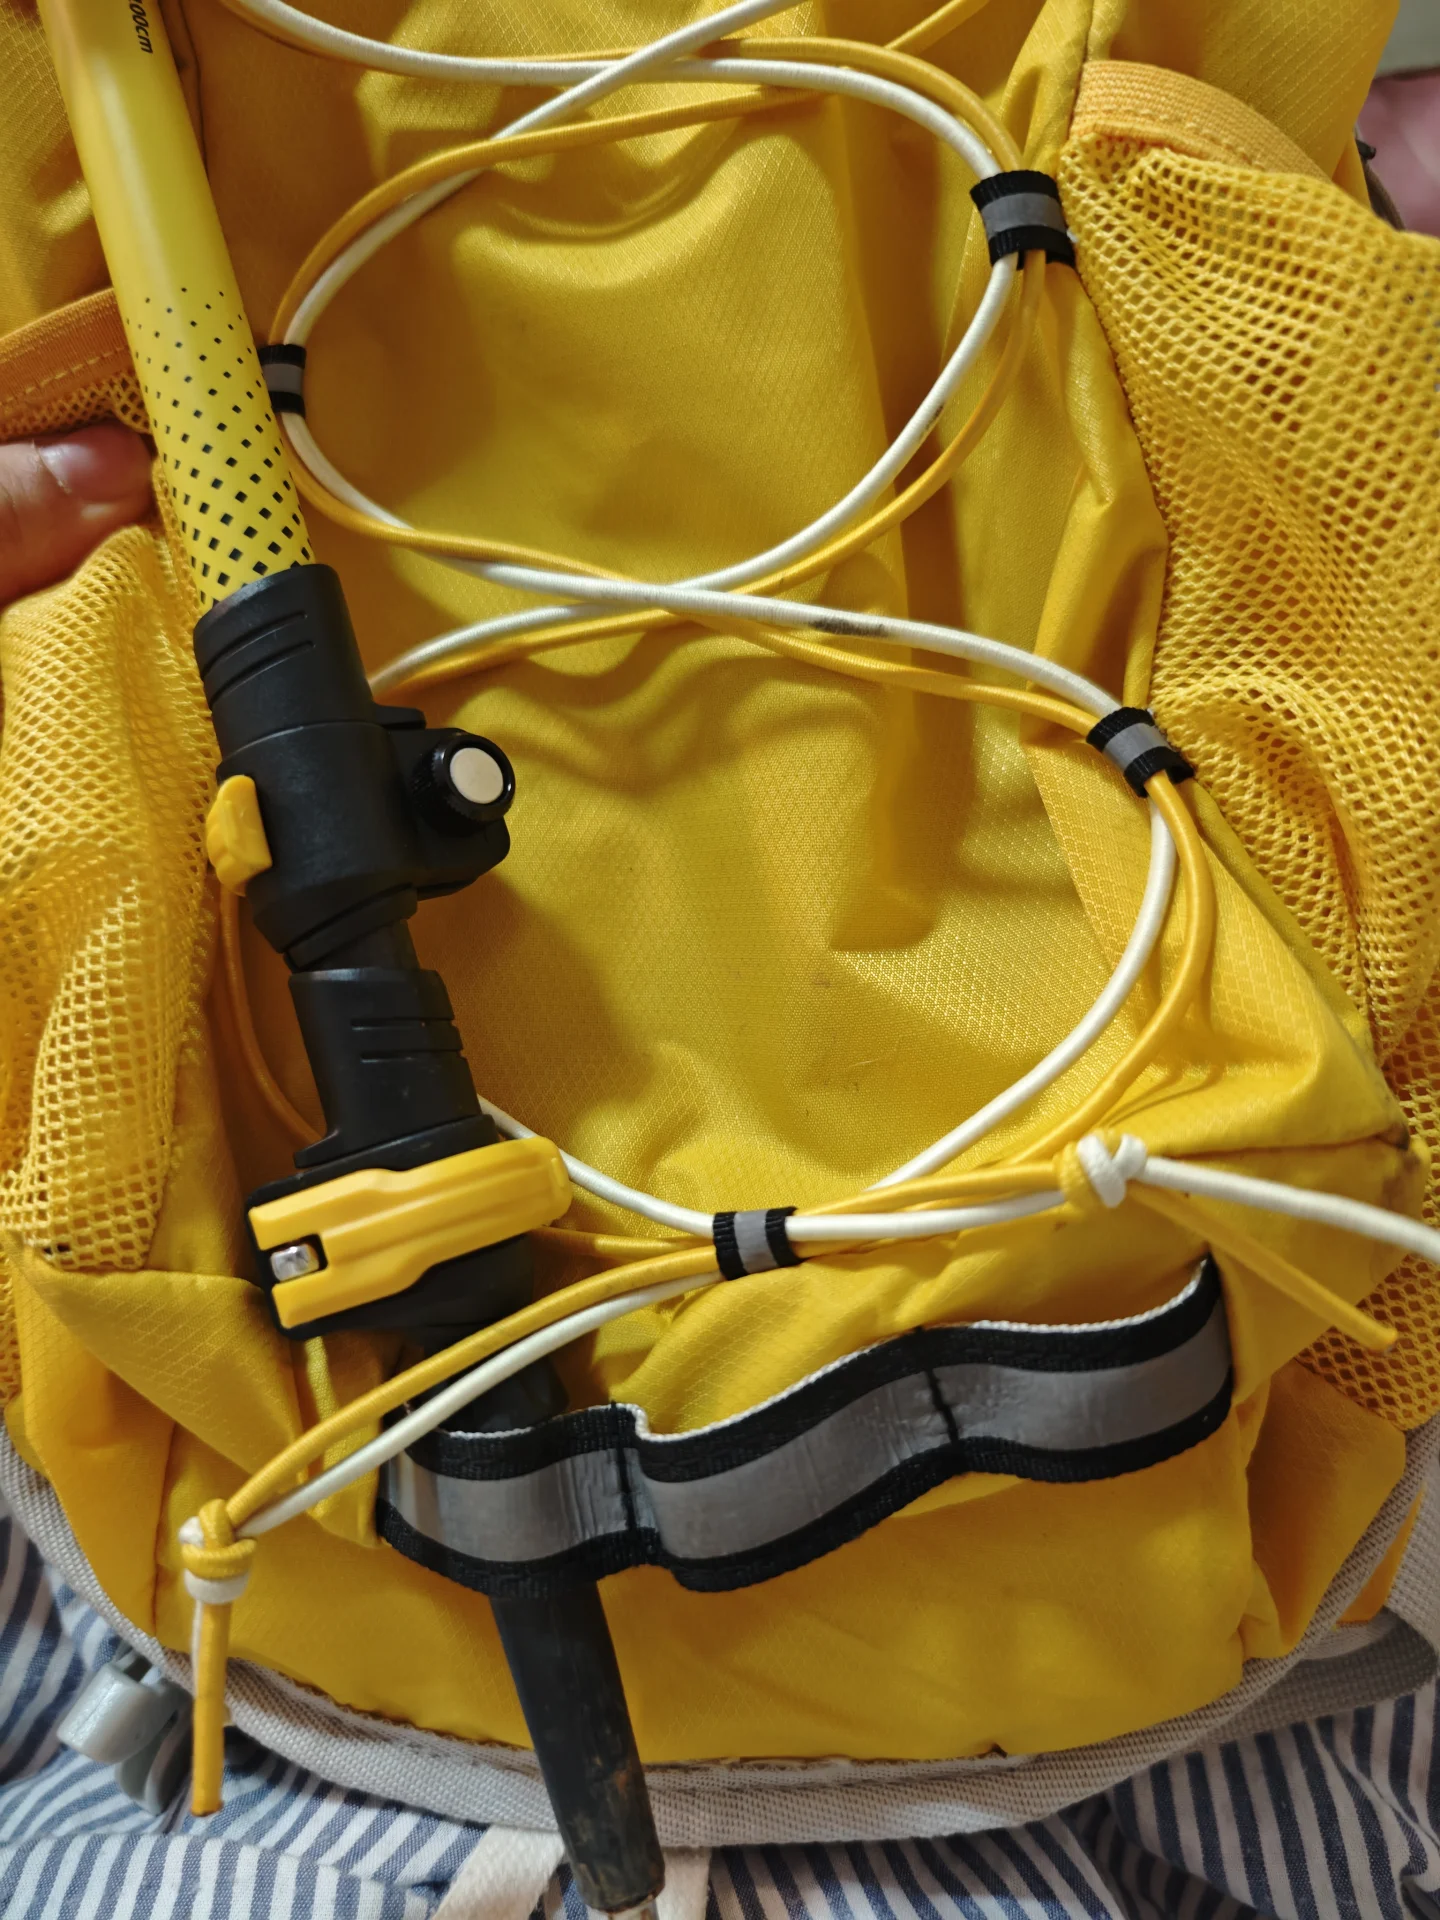
Inspect the small hardware. An owner of two pack sizes photographed poles secured on the bag and a close view of the small plastic retaining clip. Check how each clip captures the cord or webbing before tightening the upper attachment.
If the pack instructions show a particular route through a buckle or clip, follow that route. A similar-looking plastic fitting may have a tight slot for cord and a wider one for webbing. Verify the construction on your own pack instead of copying another bag’s photograph.
Walk with the loaded bag and look for movement
Put the items for your outing in the pack, then try it on. Walk, turn, and stop in a clear area. Listen for rattling and check whether the bundle slides, swings, or contacts your arms.
Take the bag off and set it down as you normally would. Make sure the poles do not become the first thing bearing the bag’s weight. A setup that stays still while walking may need a different resting position at a break.
What you notice
What to check
The poles slide downward
Lower retention and the upper strap’s grip
The bundle swings outward
Separation and tension of the two attachment points
A grip contacts your head
Packed length and attachment position
A tip is exposed
Tip protection and the intended lower holder
A cord keeps loosening
Cord-lock seating and compatible replacement parts
Repeat the check after the first short section of the hike. The pack’s shape can change as contents settle or water is removed. Adjust while stopped, then check both points again before continuing.
Choose quick stow for short pauses in use
A harness-side stow system can be convenient when switching briefly from poles to free hands. It needs to leave room for arm movement and the pole tips. Practice inserting and removing the pair while standing somewhere clear.
For a longer period, use the storage arrangement intended for that duration and terrain. If the poles catch your stride or crowd your arms, stop and use a more secure pack attachment. Accessibility is useful only when the arrangement remains comfortable.
Think about your next stop too. If you expect to need a jacket, bottle, or camera, keep the poles from blocking that compartment. Check access with the full bag rather than discovering the conflict during a wet or crowded break.
If the bag has no pole holders
Look first for a storage method the pack manufacturer supports, including compatible removable straps. Check whether folded poles fit inside without pressing tips into the fabric. A separate sleeve can help contain the bundle, but it still needs suitable retention.
One owner added elastic cord and small fittings to a bag, then found the original long cord inconvenient and shortened it. The useful lesson is to test slack and access before committing to a final arrangement. Choose hardware that fits the existing attachment points and can be removed without damaging the pack.
Another owner building extra holders discovered a missing cord lock only after fitting an end piece that was difficult to remove. Lay out the complete system before assembly. If the bag lacks a suitable supported mounting point, carrying the poles inside or choosing another bag can be simpler than adding new holes or seams.
FAQ
How do you attach hiking poles to a backpack?
Fold or collapse the poles, use the pack’s intended lower holder and upper retainer, and contain the tips. Test the arrangement with the bag loaded, including taking it off and setting it down. Recheck after the first part of the walk.
How can you secure trekking poles without dedicated loops?
Check for a manufacturer-supported side-pocket and compression-strap arrangement or compatible removable holders. Folded poles may also fit inside the bag with their tips protected. Choose a setup that stays contained when walking and handling the bag.
Can you hang poles from only one strap?
A single loose attachment can let the poles swing or slide. Use the pack’s intended system and check retention at two separated points where that design calls for them. Stop to fix movement before continuing along a narrow or busy path.